
Is Renting Moving Boxes Worth It? An Honest Look at the Pros and Cons

Moving to a Chicago Apartment? Everything You Need to Know About High-Rise and Condo Moves
Moving to a Chicago apartment is not the same as moving into a house in the suburbs. You are working around elevator windows, building deposits, narrow hallways, and the unpredictable Chicago weather. Get one of those details wrong and your move can stretch from one tough day into a tough week.
This guide breaks down everything that makes a Chicago high-rise or condo move different. You will learn how to reserve an elevator, how to handle parking permits, how to pick supplies that survive snow and rain, and how to move efficiently in tight Chicago hallways. By the end, you will have a clear plan and a packing strategy that fits the city.
What Makes Moving to a Chicago Apartment Different
Chicago is one of the most apartment-dense cities in the country. The convenience of city living comes with rules that suburban movers never deal with.
Building Requirements You Cannot Skip
Most Chicago high-rises and many condos require all of the following before moving day:
Elevator reservations. Buildings often require two to four weeks of notice and assign you a four-hour or six-hour move window, usually weekdays from 9 AM to 5 PM.
Refundable building deposits. Expect $200 to $500 to cover any damage to walls, floors, or elevators.
Certificate of Insurance (COI) from your mover. Buildings require this from professional movers and sometimes from rental truck operators.
Move-in fees. Some condo associations charge a non-refundable fee on top of the refundable deposit.
Call your building manager the moment your lease or closing date is set. Reservation slots fill fast during Chicago’s peak season from May through September.
Parking Permits in Permit Zones
The City of Chicago requires a temporary parking permit for moving trucks in most residential permit zones. You can apply through your alderman’s office or the CDOT permit portal. Apply at least five business days before moving day. The permit is around $25 per day, and you must post the signs in the legal time window before your move.
Skip this step and your truck has nowhere legal to park. That is the fastest way to wreck a Chicago move.
Why Green Moving Boxes Work Best for Chicago Apartments
Apartment moves and reusable boxes are made for each other. Here is why.
Stackable, Uniform, and Easy to Carry
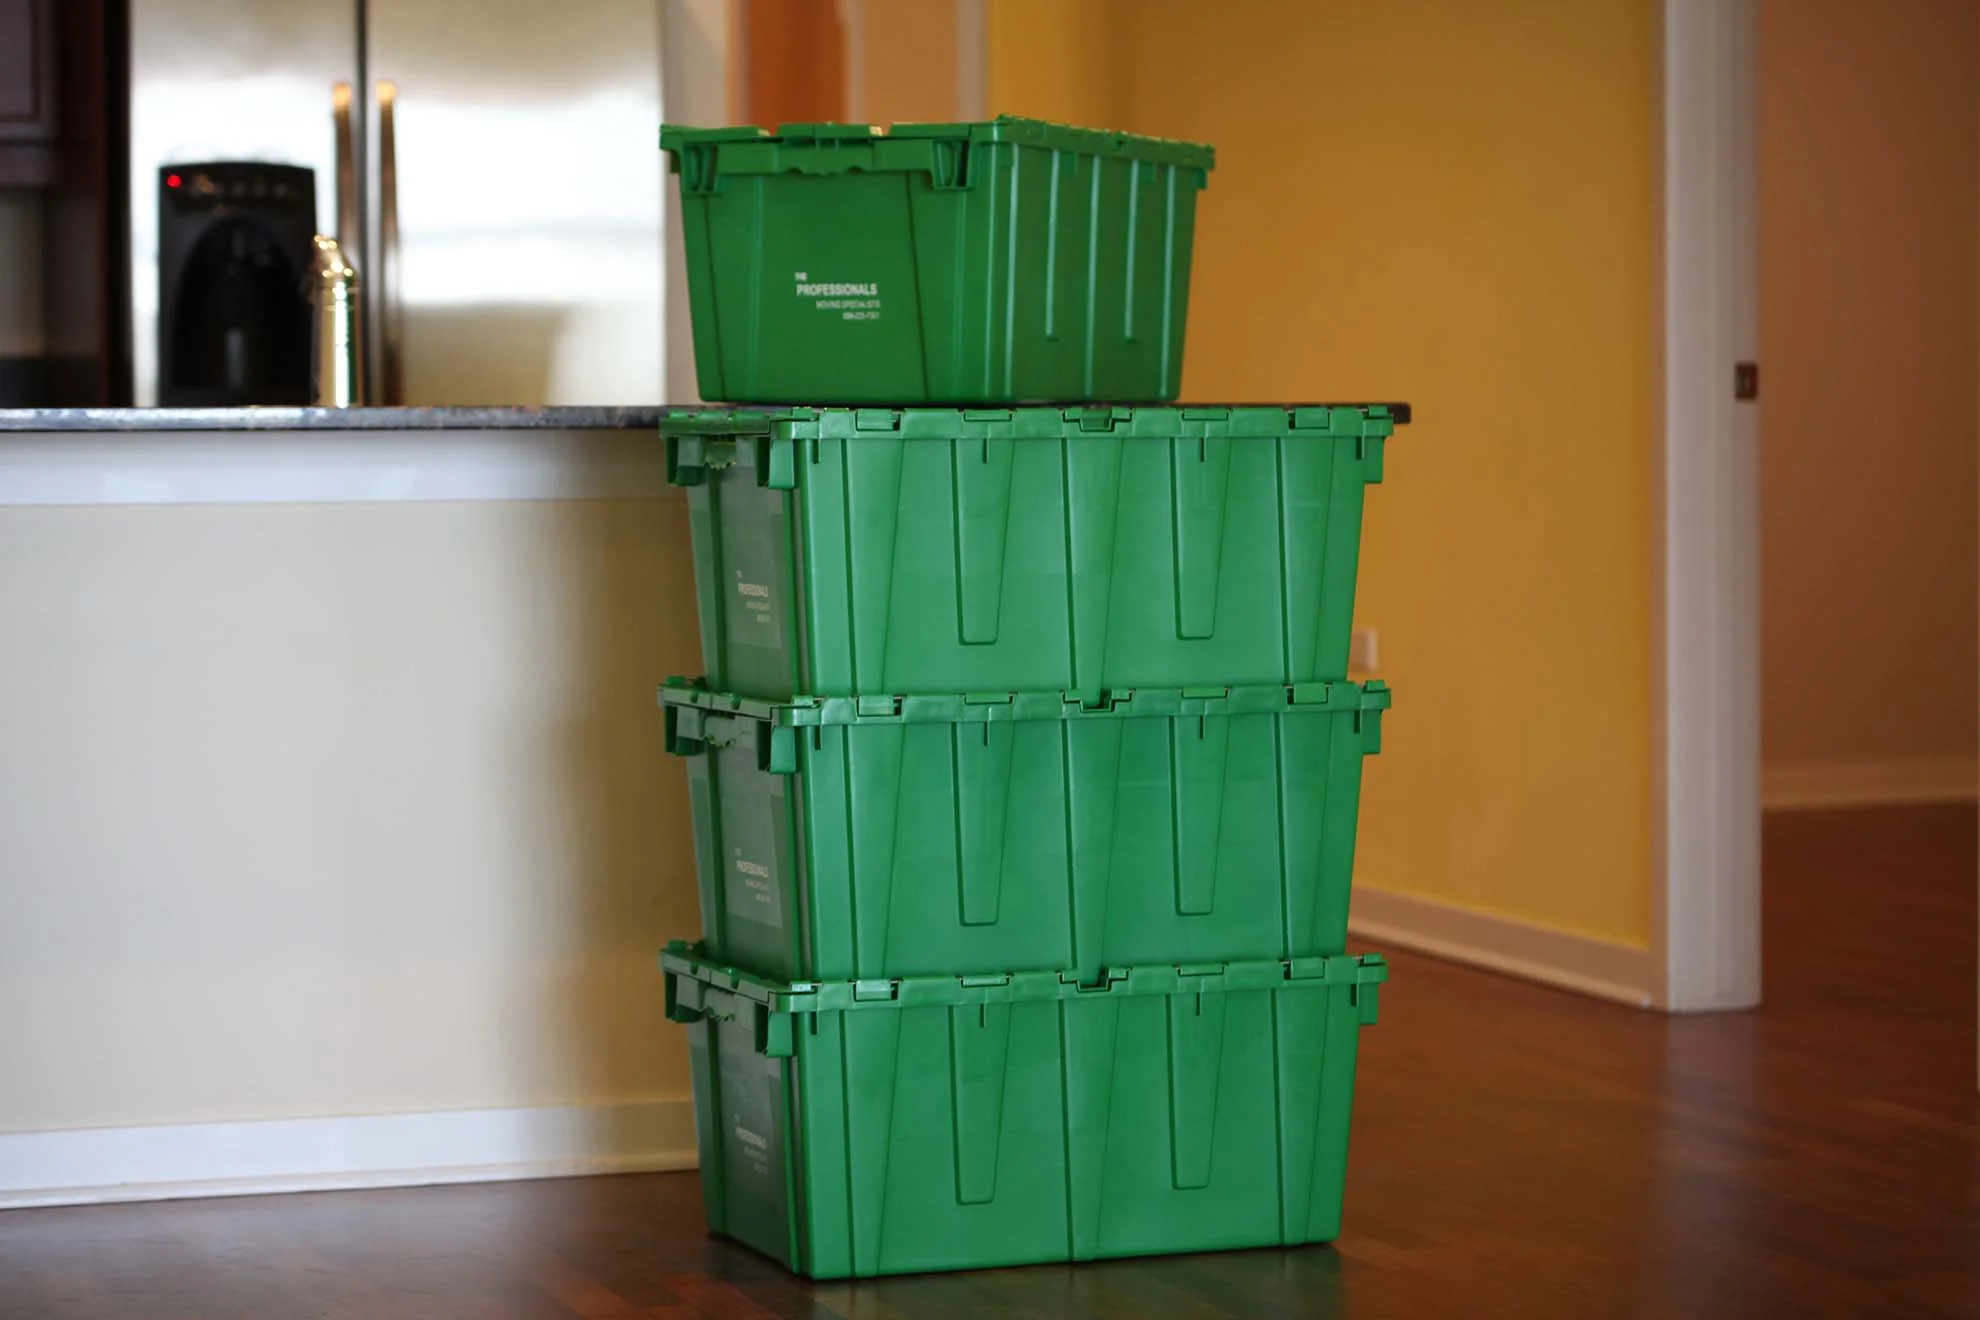
Every green box is the same size: 27 inches by 17 inches by 12 inches. Uniform sizing matters when your building gives you a four-hour elevator window. You can pack a freight elevator in fewer trips because the boxes stack tight and predictable. Cardboard boxes in mixed sizes do not load efficiently.
Each box has comfortable carrying handles. In a Chicago walk-up or a narrow hallway in a vintage Lincoln Park brownstone, handles change everything. You can carry a 60-pound box up a flight of stairs without wrestling it.
Built for Chicago Weather
Cardboard fails in rain and snow. The bottom drops out, the sides collapse, and your belongings end up wet on the sidewalk. Green boxes are made of rigid, water-resistant plastic that does not absorb moisture. A surprise April thunderstorm or a January snow squall does not ruin your move.
This is not a small detail. Chicago has unpredictable weather year-round, and a single rained-on cardboard box can mean replacing electronics or books that were not insured.
No Tape, No Assembly, No Disposal
Boxes arrive at your door pre-assembled and sanitized. The lids snap closed without tape. After your move, you stack them by the door and the team picks them up. You never deal with a closet full of broken-down cardboard or a recycling trip you do not have time for.
For more on the box experience, see why customers choose green moving boxes over cardboard.
How to Plan a Chicago Apartment Move Step by Step
Here is the order of operations for a clean, fast apartment move.
Step 1: Confirm Building Rules at Both Addresses
Call your old building and your new building. Get the move-out and move-in policies in writing. Confirm:
Allowed move-in days and hours
Elevator reservation process and lead time
Refundable deposit and any non-refundable fees
COI requirements
Loading dock or service entrance location
A 15-minute call now saves a four-hour problem on moving day.
Step 2: Reserve Elevators in Both Buildings
Lock in your elevator times as soon as your dates are set. If your old building only has weekday windows and your new building only has weekend windows, you need to know that before your mover quotes you a price.
Step 3: Order Boxes That Fit Apartment Living
For most apartment moves you need:
Studio: 20 boxes
One-bedroom: 30 to 40 boxes
Two-bedroom: 40 to 60 boxes
Three-bedroom: 60 to 80 boxes
You can order green moving boxes online in under five minutes and pick a delivery date that matches your packing week.
Step 4: Apply for Your Parking Permit
Apply at least five business days before your move. Post the signs in the legal time window. Take photos of the posted signs in case enforcement is needed.
Step 5: Pack Like You Live in a City
City packing is different from suburban packing. Use these rules:
Keep boxes under 50 pounds even though green boxes hold 100. You and the movers thank yourselves on stair carries.
Label every box with the destination room. Color-coded painter’s tape on the lid speeds up unloading at the new building.
Pack one “first night” box with toiletries, chargers, medications, and sheets. Keep it with you, not on the truck.
Pack heavy items (books, dishes) in fewer boxes that go on the bottom of the stack.
For a deeper guide, see the complete Chicago moving checklist for week-by-week prep.
Common Chicago Apartment Moving Mistakes
Avoid these and your move stays on schedule.
Mistakes That Cost You Time and Money
Booking the elevator too late. Peak season slots vanish four weeks out. Call the day you sign the lease.
Forgetting the parking permit. No permit, no truck. Some buildings will refuse to release your elevator if there is no legal parking.
Buying cardboard at the last minute. A Home Depot run on moving morning costs you an hour and gives you boxes that may not survive the day. Pre-ordered green boxes show up the day you choose.
Underestimating Chicago hallways. Vintage buildings have tight turns and narrow doors. Uniform, stackable boxes navigate these spaces. Big oversized boxes do not.
Skipping the COI. Buildings turn movers away at the door without a valid COI on file.
If you want a full-service Chicago mover that knows every one of these landmines, The Professionals Moving Specialists handles apartment and condo moves across the city using these same green boxes.
Common Questions About Moving to a Chicago Apartment (FAQ)
Q: How far in advance should I reserve a Chicago high-rise elevator? A: Reserve your elevator at least two to four weeks in advance, and longer during peak season from May through September. Some downtown high-rises require six weeks of notice.
Q: Do I need a parking permit to move into a Chicago apartment? A: Yes, most Chicago residential streets are in permit zones that require a temporary moving truck permit from the City. Apply at least five business days before your move.
Q: Are reusable moving boxes worth it for a small Chicago apartment? A: Yes, especially for small apartments. The 20-box minimum at $120 is comparable to buying cardboard plus tape and supplies, with no assembly, no disposal, and no waste.
Q: Can I move into a Chicago high-rise on a weekend? A: Some buildings allow Saturday moves with advance notice, but many restrict moves to weekday business hours. Always confirm with the building manager before booking your mover.
Q: What happens if my movers do not have a Certificate of Insurance? A: The building can refuse to let them on site. Always confirm your mover provides a current COI before moving day, and send it to your building’s management office in advance.
Conclusion
A Chicago apartment move rewards preparation. Reserve your elevators early, lock in your parking permit, and pick supplies that handle the city’s tight hallways and unpredictable weather. With the right plan and the right boxes, you can move into a high-rise, condo, or vintage walk-up without losing your mind.
Green moving boxes are built for the way Chicagoans actually live. Stackable, water-resistant, easy to carry, and easy to return. Order your green moving boxes and check the biggest variable off your Chicago apartment moving plan.
The Chicago Green Box has helped Chicagoans move smarter since 2012. Our reusable boxes are delivered pre-assembled, picked up after your move, and reused up to 400 times. Save money. Save the planet. See how it works or contact us with questions.
The Complete Chicago Moving Checklist: A Week-by-Week Timeline for a Stress-Free Move
A Chicago move has more moving parts than most people expect. You are juggling a lease, parking permits, elevator reservations, utility transfers, and a packing process that can swallow your weekends if you let it. A good Chicago moving checklist gives you a calm, week-by-week plan so nothing falls through the cracks.
This guide walks you through the full eight weeks before moving day, plus the week after. You will learn when to book movers, when to order green moving boxes, when to apply for a city parking permit, and how to handle Chicago-specific details like elevator windows and dibs season. Save it, share it, and check off each step as you go.
Why a Chicago Moving Checklist Matters
Chicago is not a city you can move into on a whim. Many high-rise buildings require elevator reservations weeks in advance. The City of Chicago requires temporary parking permits in many neighborhoods. Utility hookups, ComEd transfers, and city sticker updates all run on their own timelines.
A checklist solves three problems at once. It spreads the work across eight weeks instead of cramming everything into the final 72 hours. It catches the small Chicago-specific details that surprise first-time movers. And it lines up the right resources at the right time, including reusable moving boxes that arrive pre-assembled and get picked up after you unpack.
You can also pair this checklist with a sister plan if you are hiring full-service help. The Professionals Moving Specialists is the local mover that uses these same boxes for sustainable moves across Chicagoland.
8 Weeks Before Moving Day
This is the planning stage. You are not packing yet, but the decisions you make now shape every week that follows.
Lock In the Big Decisions
Confirm your moving date and your new address.
Re-read your current lease for the required notice period (60 days is common in Chicago).
Send your written notice to your landlord by certified mail or your building’s required method.
Start a moving binder or digital folder for receipts, contracts, and confirmations.
Begin a room-by-room declutter so you only pay to move what you actually want.
A solid declutter at week eight cuts the box count for the rest of your move. Fewer boxes means lower costs and less stress on moving day.
6 Weeks Before Moving Day
Now you start booking the people and supplies you will need on moving day.
Book Your Movers and Boxes
Get at least three quotes from licensed Illinois movers. Verify each one with the Illinois Commerce Commission household goods carrier list.
Reserve your moving truck or full-service mover.
Reserve your green moving boxes. You can order green moving boxes online in under five minutes and choose a delivery date.
If you live in or are moving into a high-rise, contact both buildings to reserve elevator time. Most buildings require two to four weeks of notice and a refundable deposit.
Request a Certificate of Insurance from your mover if either building requires one.
Reserving boxes early matters during peak season. Chicago moving season runs from May through September, and delivery windows fill up fast.
4 Weeks Before Moving Day
This is the logistics window. You handle the address changes and service transfers that take time to process.
Transfer Utilities and Update Your Address
Schedule disconnect and reconnect dates with ComEd for electricity.
Schedule gas service with Peoples Gas.
Set up Chicago water and sewer service through the City of Chicago Department of Finance.
Transfer or set up internet and cable.
File a USPS change of address through the official USPS site.
Update your address with the Illinois Secretary of State, your bank, your insurance, and your employer.
Update your voter registration if you are moving within Chicago or into the city.
Avoid scheduling utility disconnect on your old place before reconnect at your new place. Same-day transfers prevent paying double.
2 Weeks Before Moving Day
Now the packing begins. This is the week your green boxes earn their keep.
Pack Smart, Pack Once
Accept your box delivery. Pre-assembled, sanitized boxes arrive at your door with no tape required.
Pack room by room. Label each box with the destination room and a short content summary.
Apply for a City of Chicago temporary parking permit for your moving truck. You need to apply at least five business days in advance.
Confirm elevator times with both buildings.
Schedule any donation pickups (Brown Elephant, Salvation Army, Furniture Bank) for items you decided not to move.
Pack a “first night” box with toiletries, chargers, medications, sheets, and coffee gear.
Stackable boxes with rigid sides protect electronics, books, and dishes far better than cardboard. You will not need bubble wrap for most items if you nest them with towels and clothing.
1 Week Before Moving Day
The final stretch is about confirmations and last-minute packing.
Final Confirmations and Final Packs
Confirm your mover’s arrival time and your truck size.
Confirm your parking permit and post the signs in the legal window required by the City.
Pack everything except daily essentials.
Defrost the freezer and clean out the fridge.
Withdraw cash for tips if you are using full-service movers.
Charge your phone, your speaker, and any devices you will need on moving day.
If you are moving in winter, double-check the weather forecast and have a backup plan for snow days.
Moving Day
You have done the work. Today is execution.
Run the Day Like a Project Manager
Be on site before the movers arrive.
Walk through each room with the lead mover and confirm what goes and what stays.
Tape your parking permit signs to nearby trees or poles in the legal window.
Keep your essentials box and important documents with you, not on the truck.
Do a final sweep of every closet, cabinet, and drawer before locking up.
Take meter readings at both addresses if your utilities require them.
A clear plan and labeled boxes turn a stressful day into a productive one.
The Week After Your Move
Moving day is not the finish line. The first week in your new place is when you settle in.
Unpack, Update, and Schedule Pickup
Unpack your first night box, then your kitchen and bathroom.
Check that all utilities are working and meters are reading correctly.
Update your driver’s license address through the Illinois Secretary of State.
Update your Chicago city vehicle sticker if you have a car.
Schedule your green box pickup. Stack the empty boxes by the door and the team picks them up from your new location.
Test smoke detectors, change locks, and learn your building’s trash and recycling schedule.
No cardboard breakdown. No recycling trip. No dumpster overflow. A green move ends as cleanly as it started.
Common Questions About a Chicago Moving Checklist (FAQ)
Q: How far in advance should I start a Chicago moving checklist? A: Start eight weeks before your move date if possible. Eight weeks gives you time to handle elevator reservations, parking permits, and utility transfers without rushing.
Q: Do I need a permit to park a moving truck in Chicago? A: Yes, in most Chicago residential zones you need a temporary parking permit from the City of Chicago. Apply at least five business days in advance through the CDOT permit portal.
Q: When should I order moving boxes for a Chicago move? A: Order your boxes about six weeks before your move during peak season (May through September) and at least two to three weeks ahead during the off-season. You can choose a delivery date that lines up with your packing week.
Q: How many moving boxes do I need for a Chicago apartment? A: A studio usually needs about 20 boxes, a one-bedroom needs 30 to 40, a two-bedroom needs 40 to 60, and a three-bedroom needs 60 to 80. The Chicago Green Box minimum order is 20 boxes for $120.
Q: What is the most stressful part of a Chicago move and how do I avoid it? A: Building logistics cause more last-minute stress than packing does. Reserve elevators early, lock in parking permits, and confirm Certificates of Insurance with both buildings well before moving week.
Conclusion
A Chicago move is a project, not a single day. With a week-by-week checklist, you can spread the work across two months, dodge the Chicago-specific surprises, and walk into your new place feeling organized instead of exhausted.
The right supplies make the plan easier. Pre-assembled, sanitized green moving boxes save you time on the front end and zero waste on the back end. Order your green moving boxes when you hit the six-week mark and check one more thing off your Chicago moving checklist.
The Chicago Green Box has helped Chicagoans move smarter since 2012. Our reusable boxes are delivered pre-assembled, picked up after your move, and reused up to 400 times. Save money. Save the planet. See how it works or contact us with questions.
How Much Does It Cost to Rent Green Moving Boxes in Chicago?
If you are planning a move in Chicago, one of the first questions you have is simple: how much will boxes cost? Cardboard adds up faster than most people expect, and reusable green boxes can save you money while keeping waste out of landfills. The green moving box rental cost in Chicago is straightforward, with no hidden fees and free delivery within a 10-mile radius of our facility. This guide breaks down what you actually pay, what is included in your rental, and how green boxes compare to buying cardboard. By the end, you will know exactly what to budget for your move.
What Does Green Moving Box Rental Cost in Chicago?
Our pricing starts at $120 for 20 boxes, which is the minimum order. That price covers the boxes, free delivery, and free pickup if you are within 10 miles of our facility at 3918 N Western Ave. Larger packages (40, 60, and 80 boxes) are available, and you can contact us for a custom quote if you need a bigger order or service beyond the standard radius.
Every rental runs for up to four weeks. That gives you time to pack at your old place, move, and unpack at the new one without rushing. If you need extra time, additional fees apply per week. We accept Visa, Mastercard, and Discover.
What Is Included in Your Rental
Your rental fee covers more than just the boxes. Here is what you get:
Pre-assembled, sanitized boxes delivered straight to your door
Free delivery and pickup within the 10-mile radius
No tape or assembly needed: the lids snap shut and the boxes are ready to load
Stackable, water-resistant plastic boxes that hold up to 100 lbs each
Pickup from your new location after the move is done
There is no charge for assembly time, no recycling trip after, and no surprise fees. You pay one price and the rest is handled.
How Many Boxes Do You Actually Need?
The right package depends on the size of your home. Here is a simple guide based on what most movers use:
Studio apartment: 20 boxes (the minimum order)
One-bedroom: 30 to 40 boxes
Two-bedroom: 40 to 60 boxes
Three-bedroom: 60 to 80 boxes
If you are not sure, it is better to order a few extra than to run out mid-pack. To see how the full process works from order to pickup, check our first-time green box rental guide.
Green Box Rental vs. Buying Cardboard: The Real Cost
The sticker price of cardboard looks cheaper at first. A medium box at Home Depot or U-Haul runs about $2 to $3, so 20 boxes might cost $40 to $60. But cardboard has hidden costs that pile up fast.
The Hidden Costs of Cardboard
When you buy cardboard, you also need:
Packing tape: $5 to $15 for a roll or two
Bubble wrap or packing paper: $10 to $20
Labels and markers: $5 to $10
Time to assemble each box: about one to two hours total
Time to break down and dispose of boxes after the move: another one to two hours
A trip to the recycling center (or a stack of cardboard taking over your new place)
Add it up and that “cheap” cardboard run climbs to $70 to $100 for a small move, plus three to four hours of your time. Cardboard also collapses in rain or humidity, and a wet Chicago move day can turn a stack of boxes into a soggy mess.
Total Cost Scenarios for Chicago Moves
Here is how the math plays out for common Chicago moves:
Studio (20 boxes): Green box rental is $120 flat. Cardboard equivalent runs about $70 to $90 plus supplies and time.
One-bedroom (30 to 40 boxes): Green box rental scales with the package size you choose. Cardboard plus supplies easily hits $100 to $160, with several hours of extra work.
Two-bedroom (40 to 60 boxes): Cardboard for a move this size adds up quickly, especially with the tape, paper, and disposal headaches. A green box package keeps it simple.
Three-bedroom (60 to 80 boxes): This is where green boxes really shine. You skip the trip to buy 80 boxes and the post-move cardboard mountain entirely.
For a deeper breakdown of the trade-offs, see our reusable moving boxes vs. cardboard comparison.
What You Are Really Paying For (Beyond the Price)
The dollar cost is only part of the picture. When you rent green boxes, you are also paying for convenience, durability, and a smaller environmental footprint.
Convenience and Time Savings
Cardboard takes time you do not have during a move. You drive to the store, load up on flat boxes, drive home, fold and tape each one, and then pack. After the move, you break them down again and figure out how to recycle them. Green boxes show up pre-assembled and stack flat after pickup. That is two to four hours of your weekend you get back.
Better Protection for Your Stuff
Each green box holds up to 100 lbs, which is more than double what a typical cardboard box can manage. The hard plastic sides do not crush, and the lids stay sealed. Books, dishes, and electronics ride safer. The boxes are also water-resistant, so a sudden Chicago rainstorm on moving day will not soak your belongings.
Environmental Impact
The EPA reports that paper and paperboard make up about 23% of municipal solid waste sent to landfills (see the EPA Facts and Figures report). Used cardboard moving boxes are a big part of that. Each green box can be reused up to 400 times before it is recycled, which keeps a lot of waste out of the landfill. If your sister move involves a full-service crew, our partner The Professionals Moving Specialists offers green moving services that pair perfectly with green box rentals.
Tips to Get the Most Value From Your Rental
A few simple choices stretch your rental dollars further.
Order the Right Package the First Time
Running short on boxes mid-pack is stressful. Use the size guide above and round up if you are between sizes. The cost of a slightly bigger package is less than the time you lose tracking down extra boxes.
Pack and Move Within the Four-Week Window
Your rental period is up to four weeks. Plan your packing, moving, and unpacking schedule so you return the boxes on time. If a delay is unavoidable, contact us early so we can adjust your pickup. For help mapping out the timeline, our Chicago moving checklist walks through every week.
Stack Empty Boxes by the Door for Pickup
After you unpack, place the empty boxes near your front door or in a clear spot. The pickup team grabs them quickly, and you avoid any extra-time fees. There is no breakdown, no tape to peel, and nothing to drive to the recycling center.
Combine With a Full-Service Mover for Bigger Jobs
If you are moving a larger home or office, pair the box rental with a professional moving company. Many Chicago movers, including The Professionals Moving Specialists, work directly with green boxes because the uniform shape loads trucks more efficiently. That can shave time off the moving crew’s bill.
Common Questions About Green Moving Box Rental Cost in Chicago (FAQ)
Q: How much does it cost to rent green moving boxes in Chicago? A: Rental starts at $120 for 20 boxes, which is our minimum order. Larger packages (40, 60, and 80 boxes) are available, and free delivery and pickup are included within a 10-mile radius of our Chicago facility.
Q: Are there any extra fees with a green box rental? A: The base price covers boxes, delivery, and pickup. Extra fees only apply if you keep the boxes past the four-week rental window, request delivery beyond the 10-mile radius, or add accessories like wardrobe boxes.
Q: How does green box rental cost compare to buying cardboard boxes? A: Cardboard looks cheaper up front, but once you add tape, packing paper, assembly time, and disposal, the totals are usually similar or higher. Green boxes also protect your belongings better and produce zero waste.
Q: How long is the rental period? A: The standard rental period is up to four weeks (one month). That covers most moves with time to spare. If you need longer, we charge a small fee for additional days or weeks.
Q: What payment methods are accepted? A: We accept Visa, Mastercard, and Discover. American Express is not currently accepted. You can pay online when you place your order through our order page.
Conclusion
The green moving box rental cost in Chicago is simple: $120 for 20 boxes, with bigger packages available and free delivery and pickup within 10 miles. That price includes pre-assembled, sanitized, water-resistant boxes that hold up to 100 lbs each, plus pickup at your new place when you are done. Compared to cardboard, you save time, protect your belongings better, and skip the disposal headache entirely. Whether you are moving to a studio in Lakeview or a three-bedroom in the suburbs, green boxes give you a clear, all-in price. Ready to book? Order your green moving boxes online in under five minutes.
Winter Moving in Chicago: How to Survive a Cold-Weather Move Without the Stress
Moving on a Budget in Chicago: Save Money on Every Part of Your Move
Moving in Chicago is expensive enough without overpaying for things you can avoid. Between security deposits, first and last month’s rent, mover fees, parking permits, and all the little costs that add up faster than you expect, a single apartment move can easily run over two thousand dollars.
The good news is that almost every line item on your moving budget has room for savings. You just need to know where to look. This guide breaks down every major cost of a Chicago move and gives you practical, Chicago-specific ways to cut each one. Whether you are moving across town from Wicker Park to Logan Square or heading from a downtown high-rise to a quieter neighborhood, these cheap moving tips for Chicago will help you keep more money in your pocket.
Pick the Right Time to Move and Save Hundreds
The single biggest factor in what your Chicago move will cost is when you do it. Most people do not realize how dramatically pricing shifts based on timing, but it is one of the easiest ways to save money moving.
Move During the Off-Season
Chicago’s peak moving season runs from May through September. During these months, moving companies charge premium rates because demand is high. If you have any flexibility at all, schedule your move between October and April. Winter moves are the cheapest, and while nobody loves carrying boxes in January, your wallet will thank you.
You can often save 20 to 30 percent on mover rates just by shifting into the off-season. Movers also tend to have more availability, which means you are more likely to get your preferred date and time.
Move Mid-Month and Mid-Week
Leases in Chicago typically start and end on the first of the month. That means the last weekend of every month is the busiest and most expensive time to move. If you can move mid-month on a Tuesday, Wednesday, or Thursday, you will pay significantly less.
Weekend rates are almost always higher than weekday rates. Even shifting your move from a Saturday to a Monday can make a difference. Ask your moving company about their pricing for different days and you may be surprised at the gap.
Save on Moving Supplies with Reusable Green Boxes
Moving supplies are one of those costs that seem small until you start adding them up. A stack of cardboard boxes, packing tape, bubble wrap, markers, and packing paper can easily run $150 or more for a one-bedroom apartment. And when the move is over, you are stuck breaking down and recycling all that cardboard, or worse, sending it to a landfill.
Why Reusable Moving Boxes Are the Budget-Friendly Choice
Renting reusable moving boxes is one of the smartest affordable moving Chicago decisions you can make. With The Chicago Green Box, you get 20 sturdy, stackable plastic crates for $120, delivered right to your door with free delivery and pickup included.
Compare that to the cardboard route. A typical one-bedroom move requires 20 to 30 boxes, plus three to four rolls of tape, packing paper, and bubble wrap. That runs $80 to $150 or more, and you still have to go find the boxes, assemble them, tape them, and then deal with disposal afterward. With reusable green boxes, there is no assembly, no tape needed, and no waste to deal with when you are done.
These are not flimsy bins either. Each box is 27 by 17 by 12 inches with a 100-pound capacity, and they are made from 100 percent recyclable plastic built for up to 400 uses. They are waterproof, which matters more than you think if you have ever moved during a Chicago rainstorm in April. You can learn more about how the whole process works on the How Chicago Green Box Works page.
Plus, according to the EPA, non-recycled cardboard contributes to roughly 28 percent of landfill materials. So going with reusable boxes saves you money and keeps waste out of the landfill. That is a win on both sides.
Get the Best Deal on a Moving Company
Hiring professional movers is usually the biggest single expense in any move. But there are several ways to bring that cost down without sacrificing quality.
Get at Least Three Quotes
Never go with the first moving company you contact. Get at least three written estimates so you can compare pricing and services. Ask each company for both hourly and flat-rate options, and make sure the quote includes everything — stair fees, long carry charges, fuel surcharges, and any other add-ons.
When comparing quotes, do not just look at the bottom line number. A cheaper hourly rate can end up costing more if the crew is slow. Ask how many movers will be on your crew and how long they estimate the job will take.
Verify Licensing and Insurance
This is not just a quality check — it protects your budget too. In Illinois, all moving companies must be licensed by the Illinois Commerce Commission (ICC). An unlicensed mover might quote you a low price upfront and then hit you with surprise charges on moving day. Or worse, your belongings could be damaged with no insurance to cover it.
Always ask for the company’s ICC license number and verify it before signing anything. Check online reviews and look for companies with a strong track record. For example, The Professionals Moving Specialists is a family-owned Chicago mover with over 4,500 Google reviews and an A+ BBB rating. Getting a quote from an established, well-reviewed company is the best way to avoid budget surprises.
Ask About Discounts
Many moving companies offer discounts that they do not actively advertise. Ask about senior discounts, military discounts, off-season pricing, and mid-week rates. Some companies also offer a discount if you book your packing and moving together. It never hurts to ask.
Know When to DIY and When to Hire Pros
One of the biggest budget decisions you will make is whether to hire professional movers or handle the move yourself. Both options have real costs, and the cheapest choice depends on your specific situation.
When a DIY Move Makes Sense
If you are moving a studio or small one-bedroom apartment without heavy furniture, a DIY move can save you a lot. Rent a truck, recruit a couple of friends, and handle it yourself. Truck rentals in Chicago run anywhere from $30 to $100 per day depending on the size, plus mileage and fuel.
A DIY move works best when you have minimal furniture, no flights of stairs, and a short distance between your old and new places. It also helps to have friends who are willing to actually show up on moving day.
When Hiring Movers Is Worth the Money
If you have heavy furniture, a walk-up apartment with multiple flights of stairs, or a move across the metro area, hiring movers almost always saves you money in the long run. The risk of injury, damaged furniture, and the sheer time cost of a difficult DIY move adds up fast.
Professional movers bring the right equipment, know how to navigate tight Chicago staircases and hallways, and can get the job done in a fraction of the time. For most one-bedroom moves with standard furniture, a professional crew will run $400 to $800 depending on distance and complexity. That is a real cost, but it buys you speed, safety, and sanity.
Handle Chicago Parking Permits the Right Way
If your moving truck needs to park on a public street at either your current or new address, you will need a temporary parking permit from the City of Chicago. This is one of those Chicago-specific costs that catches a lot of people off guard.
A City of Chicago temporary moving permit costs approximately $25 per day. You will need one for each location if both addresses require street parking for the truck. Submit your request through the city’s 311 service portal or by calling 311 at least a few weeks before your move.
The permit gives you reserved street space and comes with “No Parking” signs you post 24 to 48 hours ahead of time. Without a permit, your movers may have to double-park or circle the block looking for spots, which wastes their time and your money. If you are paying by the hour, a parking headache can easily add $50 to $100 to your moving bill. Spending $25 on the permit is a smart budget move.
If your building has a private loading dock or driveway, you may not need a street permit. Check with your building management ahead of time.
Schedule Utilities to Avoid Paying Double
One of the most overlooked budget traps in any move is paying for utilities at two addresses at the same time. If you disconnect your old service too early, you are stuck without power or gas. If you wait too long, you are paying double.
Coordinate Your Disconnect and Connect Dates
The goal is to schedule your utility disconnect at your old address and your new service activation for the same day, ideally your moving day. For a Chicago move, you will need to coordinate with several providers.
Electric: Contact ComEd to transfer or set up service
Gas: Contact Peoples Gas or Nicor Gas depending on your area
Water: Set up through the City of Chicago Department of Water Management
Internet and cable: Schedule installation with your provider at least two weeks in advance, as wait times can be long
A few days of overlap is normal, especially with internet installation timelines. But a full month of double utility payments can add $150 to $300 to your moving costs unnecessarily. Plan ahead and schedule transfers early.
Declutter Before You Move to Cut Costs
Here is a simple rule of thumb for a budget move: the less you own, the less your move costs. Fewer items mean fewer boxes, less truck space, and less time for your movers. Every item you get rid of before moving day saves you money.
Start Early and Be Ruthless
Go room by room at least four to six weeks before your move. Sort everything into keep, sell, donate, and toss piles. Be honest with yourself. If you have not used something in the past year, it probably does not need to make the trip to your new place.
Sell items on Facebook Marketplace, Craigslist Chicago, or OfferUp. Donate usable items to local organizations like Brown Elephant, The Salvation Army, or local shelters. For large items you cannot sell or donate, schedule a junk removal pickup.
The Real Math on Decluttering
Think about it this way. If you are renting moving boxes, fewer items mean you need fewer boxes. If you are hiring movers, fewer items mean less time on the clock. Even if you are doing a DIY move, fewer items mean a smaller truck and fewer trips. Decluttering does not just make your new home cleaner — it directly reduces every major cost of your move.
The FAQ page at The Chicago Green Box can help you figure out exactly how many boxes you need for your apartment size, so you only order what you actually need.
Sample Budget for a 1-Bedroom Chicago Apartment Move
Seeing all the costs in one place helps you plan and spot areas where you can save. Here is a realistic budget template for a one-bedroom apartment move within the Chicago metro area.
Expense
Budget Option
Standard Option
Moving company (local, 2 movers, 3-4 hours)
DIY truck rental: $75–$120
Professional movers: $450–$700
Moving boxes and supplies
Reusable green boxes (20 boxes): $120
Cardboard boxes + tape + supplies: $100–$175
Parking permits (2 locations)
$50
$50
Utility overlap (electric, gas, internet)
Minimal overlap: $0–$50
Unplanned overlap: $150–$300
Cleaning (old apartment)
DIY cleaning: $25–$50
Professional cleaning: $150–$250
Renter’s insurance update
$0–$25
$0–$25
Tips for movers
N/A (DIY)
$40–$100 (15–20% or $20–$25/mover)
Miscellaneous (locks, odds and ends)
$25–$50
$50–$100
Total Estimated Cost
$295–$465
$990–$1,700
The gap between the budget option and the standard option is significant. You do not have to go fully DIY to save money either. A hybrid approach — hiring movers for the heavy lifting and handling packing and supplies yourself with reusable green boxes — often hits the sweet spot between savings and sanity.
Put It All Together: Your Budget Move Action Plan
Saving money on a Chicago move is not about any single trick. It is about making smart choices at every step. Here is a quick summary of the most impactful savings.
Move off-peak — Schedule for mid-week and mid-month during the off-season for the lowest mover rates
Rent reusable boxes — Skip the cardboard and get a complete set of sturdy, stackable green boxes delivered to your door
Get multiple quotes — Compare at least three licensed moving companies before committing
Declutter first — Fewer belongings means fewer boxes, less truck space, and lower mover fees
Handle permits early — A $25 parking permit prevents expensive parking delays on moving day
Coordinate utilities — Schedule disconnect and connect for the same day to avoid double billing
You do not have to sacrifice quality to stick to a budget. With the right timing, the right supplies, and a solid plan, you can have a smooth, affordable moving experience in Chicago.
If you are ready to check one of the easiest items off your list, you can order your reusable green moving boxes online in about two minutes. Pick your delivery date, and they show up at your door ready to pack. When your move is done, they pick them up for free. It does not get much simpler than that.
For businesses or offices planning a move, The Chicago Green Box also offers commercial moving box rentals with larger quantities and flexible rental terms.
